How ESEM Works
Environmental scanning electron microscopy (ESEM) was developed about 15 years ago. Although it would likely be very expensive to modify a normal scanning electron microscope (SEM) to perform as an ESEM, a microscope designed from the beginning with a dual purpose (ESEM/SEM) can work quite well either way. The first ESEMs were made by a company called ElectroScan, and they were built on a chassis provided by Philips Electron Optics. Philips Electron Optics then bought ElectroScan, and Philips Electron Optics in turn was bought by FEI Company. Philips NV, in Holland, at one time owned controlling interest in FEI, but that may not presently be the case.
One advantage to using the environmental scanning electron microscope (ESEM) as an ESEM?operating it in 'wet' mode?is that it is not necessary to make nonconductive samples conductive. Materials samples do not need to be desiccated and coated with gold?palladium, for example, and thus their original characteristics may be preserved for further testing or manipulation. We may image the sample, modify the sample, and image the sample again, ad infinitum, without destroying its usefulness by having coated it to make it conductive. We can also perform dynamic experiments with the ESEM in wet mode; one of the hot stages may be used to heat a small sample to as much as 1500 C and image it during every step of the heating/cooling process (once we pass a certain temperature, above 1100 C, we actually need to adjust the bias to reject thermal electrons, but this can be done easily). The Peltier heating/cooling stage lets us work within 20 Celsius degrees above or below ambient temperature, and the combination of low temperature (e.g., 4 C) and high water vapor pressure (e.g., 6.1 Torr) permits us to achieve 100% relative humidity (RH) at the sample surface. At 100% RH we are not dehydrating the sample during the imaging process (at less than 100% RH, a moist sample will be constantly losing water as the vacuum in the chamber pumps on it; in the 'scope this appears as constant movement of the sample). One of our users who images the growing parts of corn plants can simply expose the areas he wants to view and put them right onto the Peltier stage for imaging.
When we use our 'scope (FEI XL30 ESEM-FEG) as an ESEM, we must isolate the specimen chamber from the upper and lower portions of the vacuum column. This must be done because we are going to introduce water vapor, as an imaging gas, to the specimen chamber (other imaging gases will work, but water is used primarily), but we do not want water vapor in other parts of the vacuum column. Water vapor, or any ions, particles, molecules, or atoms in a vacuum, normally interferes badly with the imaging process. For years we explained how SEM works by insisting that it would not work without a good vacuum. And we were correct, but now we can modify the vacuum in one important area and get away with it. With our 'scope we can add as much as 10 Torr of water vapor to the specimen chamber, so our ESEM is 'environmental' only inasmuch as the chamber can reach one seventy-sixth of an atmosphere. The bottom of the specimen chamber is closed off by shutting the main valve, and a large-bore pipe allows the oil diffusion pump that would normally pump on the chamber from below to bypass the chamber and pump off the upper portion of the column instead. The top of the specimen chamber cannot be completely closed off because the electron beam must be able to enter it. So the pole piece insert (a bullet-shaped device that contains the final aperture and is located where the electron beam enters the specimen chamber) is replaced with one specifically designed for ESEM. This 'wet bullet' insert has four pressure-limiting apertures (PLAs) in it. The apertures are simply discs with small holes bored through the center. The principle at work here is that if there is a small enough pinhole between two different vacuum levels, and the difference between levels of vacuum is not that great, vacuum will not 'diffuse' from one level to another through the pinhole. So we can have a very good vacuum at the electron gun, at the top of the column where we need a very good vacuum, and at the mid-portion of the column, in the specimen chamber, we can have a relatively poor vacuum, without endangering the electron gun. At the bottom of the column, the oil diffusion pump is, as noted, bypassing the mid-portion and contributing to the better vacuum in the upper column; this arrangement also helps scavenge any water vapor that rises through the pressure-limiting apertures.
The hole in the center of the gaseous secondary electron detector (GSED) functions as the final aperture through which the primary electron beam passes, and its bore size determines how poor the vacuum can be in the specimen chamber. The GSED in most cases forms a fitted seal over the pole piece insert (the wet bullet). If the GSED has a 500-micron aperture in it, we can increase the pressure in the chamber to as high as 10 Torr; if the GSED has a 1-millimeter aperture in it, we can take the pressure in the chamber only as high as 5 Torr. And if we use the large-field detector (LFD) version of the GSED, we do not actually fit it over the pole piece insert, so the wet bullet itself provides the final aperture, and we can take the pressure in the chamber only as high as 1 Torr.
The GSED has as much as a 600-Volt positive bias on it to attract secondary electrons. The bias is controlled by modifying the contrast control; if the contrast is set at 100% we have 600 Volts on the detector. This may be compared to the Everhart-Thornley secondary electron detector (ET SED) on a normal SEM. The ET SED ordinarily has only as much as a 300-Volt positive bias on it, and in addition it is relatively far from the sample. Thus the GSED is set up to collect secondary electrons very efficiently.
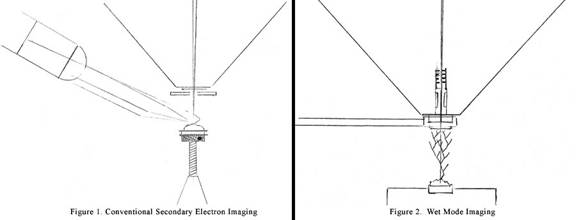
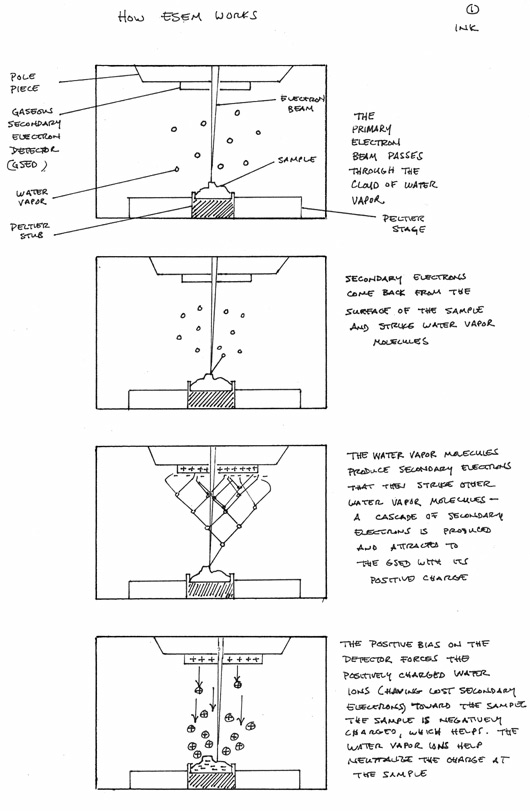
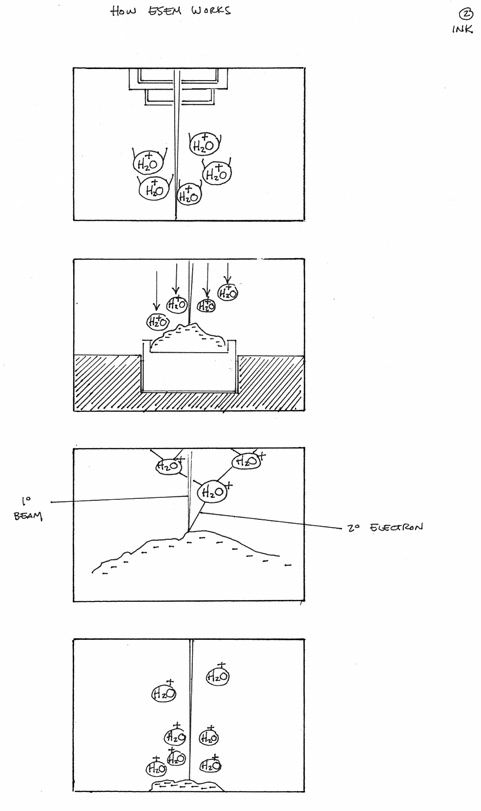
And now, this is how it works: Water vapor is introduced to the specimen chamber via a separate dedicated vacuum pump that can control the chamber pressure with great accuracy. The primary electron beam is very energetic, and it penetrates the water vapor with little apparent scatter, scanning across the surface of the sample. Secondary electrons are released from the surface of the sample, as they are in normal SEM, but they encounter water vapor molecules once they exit the surface. The water vapor molecules, when they are struck by the secondary electrons, produce secondary electrons themselves, which in turn produce secondary electrons from adjacent water vapor molecules. Thus the water vapor functions as a cascade amplifier, amplifying the original secondary electron signal from the sample. The amplified secondary electron signal is collected at the GSED (very efficiently, as noted above), with its strong and local positive charge. So we get a very good signal from the sample, and the intensity of that signal is converted into a brighter or darker portion of the image at a given point (x, y) on the sample as the electron beam moves across it.
Why don't we get charging from all of the secondary electrons impinging on the nonconductive sample? Charging, which occurs in normal SEM when the energy from the primary electrons is retained by the sample instead of being shed to an electrical ground, can produce terrible images. The reason we don't get charging in ESEM?in wet mode?is that the strong positive bias on the GSED drives the water vapor molecules, which are now nice plump positive ions, having lost their secondary electrons, toward the sample. The sample has a net negative charge from the primary beam electrons that have been bombarding it, and the positive ions that are driven toward it effectively neutralize that charge. And everything looks great?we get great images from the sample without having made it conductive or doing any other destructive things to it.
Of course wet mode imaging does not always work as perfectly as described above. One needs to find the right combination of accelerating voltage, spot size, vapor pressure, and working distance (very important), as well as working with a sample that doesn't have a huge nonconductive surface. There are little tricks that may be performed to make it work right. Often, for example, the image will look best if it is averaged a few times. And the parts of a large nonconductive sample that are not to be imaged can be made conductive by painting them with carbon or silver paint, helping the local process work that much better. ESEM is like SEM with two added degrees of difficulty. But it has distinct advantages.
[This was originally written as a response to
an email query from a gentleman in